

Let’s Get Festive!
Hey there, holiday enthusiasts! If you’re anything like me, the thought of Christmas fills you with excitement, but living in a small space can sometimes feel like a buzzkill. You might be wondering how to squeeze in all the festive vibes without turning your cozy home into a cluttered winter wonderland. Well, I’m here to share some fantastic DIY ideas that will not only brighten up your little corner of the world but also let your creativity shine bright. So grab your crafting supplies, and let’s dive into some fun and fabulous ways to deck the halls—even if those halls are a bit cramped!
1. The Minimalist Magic Tree
Who says you need a full-sized tree to feel festive? Let’s kick things off with a space-saving alternative that’s both chic and cheerful.
What you’ll need:
- Wooden dowels or branches (5-7 pieces of varying lengths)
- Twine or thin rope
- Mini ornaments
- Battery-operated fairy lights
DIY Instructions:
- Collect 5-7 dowels or branches, ranging from about 1 foot to 3 feet in length.
- Clean the branches if using natural ones, and sand any rough edges.
- Arrange them horizontally on the wall, shortest at the top, longest at the bottom, forming a triangle shape.
- Mark their positions lightly with a pencil.
- Attach removable adhesive hooks to the wall at your marked spots.
- Secure each “branch” to the hooks using twine.
- Wrap the fairy lights around the branches, starting from the top.
- Hang mini ornaments from the branches using small hooks or ornament hangers.
Voila! You’ve got yourself a 2D tree that takes up zero floor space but 100% delivers on the festive feels.

2. Mason Jar Snow Globes
Nothing says “Christmas magic” quite like a snow globe. But why buy when you can DIY? These mini winter wonderlands are perfect for brightening up any nook or cranny.
What you’ll need:
DIY Instructions:
- Choose a miniature figurine that fits comfortably inside your mason jar.
- Clean the inside of the jar and lid thoroughly.
- Using the hot glue gun, attach your chosen figurine to the inside of the mason jar lid. Let it dry completely.
- Fill the jar almost to the top with distilled water (about 1 inch from the rim).
- Add a teaspoon of glycerin – this helps the “snow” fall slowly.
- Sprinkle in a pinch of fake snow.
- Apply a thin line of hot glue around the rim of the jar for an extra seal.
- Quickly screw the lid on tightly, with the figurine facing into the jar.
- Flip the jar over and give it a gentle shake to test.
Pro tip: Make a few of these babies and arrange them on a small tray with some battery-operated tea lights for an instant festive centerpiece.

3. Festive Floating Shelves
Got a blank wall? Perfect! Let’s turn it into a Christmas showcase that doesn’t eat up precious floor space.
What you’ll need:
- Floating shelves
- Various small Christmas decorations
- Battery-operated string lights
- Level and mounting hardware
DIY Instructions:
- Choose a wall area for your display. Use a level to mark where you’ll install the shelves.
- Install 2-3 floating shelves at different heights on your wall, following the manufacturer’s instructions.
- Arrange your favorite small Christmas decorations on the shelves. Think mini trees, festive figurines, or even those adorable mason jar snow globes you just made!
- Weave battery-operated string lights around the decorations for that extra twinkle.
- Play with the arrangement until you’re happy with the look.
This setup not only serves as a space-saving Christmas display but also doubles as year-round decor when you swap out the festive items.
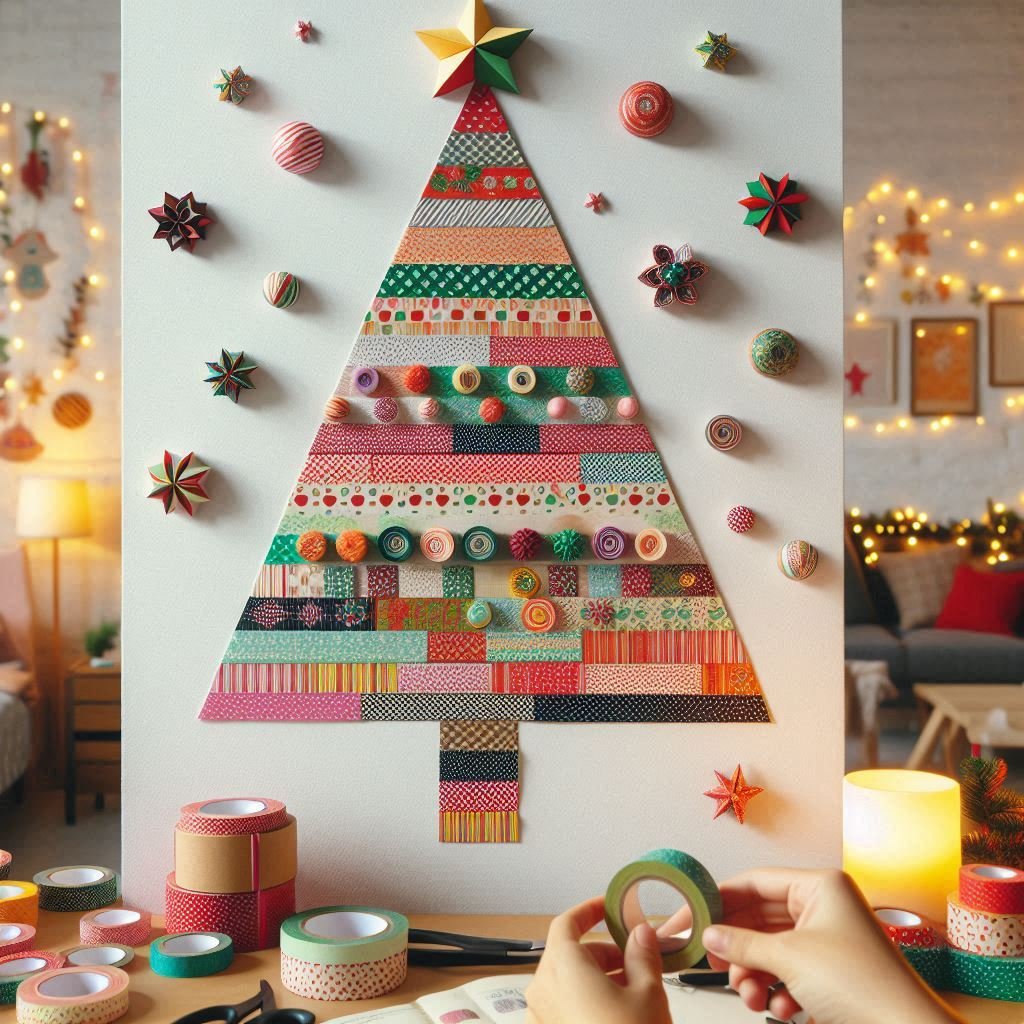
4. Washi Tape Christmas Tree
No room for a real tree? No problem! This washi tape creation is flat, fun, and fantastically easy to make.
What you’ll need:
- Various patterns of washi tape
- Scissors
- Measuring tape or ruler
DIY Instructions:
- Choose a blank wall space and clean it thoroughly.
- Using your measuring tape, mark out a large triangle shape for your tree.
- Starting from the bottom, create horizontal lines of washi tape, getting shorter as you go up, following your triangle outline.
- Use different patterns for each “branch” of your tree. Overlap slightly for a fuller look.
- For the tree trunk, use brown washi tape to create a small rectangle at the bottom center.
- Add a star at the top using gold or silver washi tape. Cut small strips and arrange them in a star shape.
- Decorate your washi tape tree with small paper ornaments or additional washi tape decorations.
The best part? When Christmas is over, it peels right off without damaging your walls. Talk about landlord-friendly decor!
5. Pinecone Fairy Light Garland
Bring a touch of the outdoors in with this charming, nature-inspired garland that’s perfect for draping over doorways or along bookshelves.
What you’ll need:
- Pinecones (about 30-50)
- White spray paint
- Twine or jute rope
- Battery-operated fairy lights
- Scissors
- Optional: glitter spray
DIY Instructions:
- Clean your pinecones and let them dry completely.
- In a well-ventilated area, spray paint the pinecones white for a snowy effect. Let dry.
- Optional: Add a light dusting of glitter spray for extra sparkle.
- Cut a length of twine about 2 feet longer than your intended garland length.
- Tie each pinecone to the twine, spacing them about 6 inches apart. Secure with a dab of hot glue if needed.
- Once all pinecones are attached, weave the fairy lights between them, wrapping around the twine.
- Create loops at each end of the twine for hanging.
Hang this beauty anywhere you need a festive touch. It’s lightweight, so even the flimsiest of command hooks can handle it.
6. Origami Christmas Ornaments
Channel your inner elf and craft some delightful paper ornaments. They’re lightweight, customizable, and perfect for hanging just about anywhere.
What you’ll need:
- Colorful origami paper
- Scissors
- String or thin ribbon
- Optional: beads for decoration
DIY Instructions:
- Choose an origami design. Simple stars or cranes work well for beginners.
- Follow step-by-step origami tutorials (plenty available online) to create your chosen shape.
- Once folded, use a needle to poke a small hole near the top of your ornament.
- Thread a piece of string or ribbon through the hole and tie it to form a loop.
- Optional: Add small beads to the string for extra decoration.
- Repeat to create multiple ornaments in various colors and designs.
Scatter these paper pretties on your washi tape tree, hang them from light fixtures, or create a charming mobile to suspend from the ceiling.
7. Festive Window Silhouettes
Transform your windows into magical Christmas scenes without taking up any actual space inside your home.
What you’ll need:
- Black construction paper
- Scissors
- Tape
- White tissue paper (optional)
- Pencil
- Stencils (optional)
DIY Instructions:
- Measure your window and cut a piece of black construction paper to fit.
- Draw or trace Christmas-themed silhouettes onto the paper (think reindeer, Santa, snowflakes).
- Carefully cut out your designs using scissors.
- For an extra magical touch, first cover the entire window with white tissue paper, securing it with tape.
- Tape your black paper cutout to the window or tissue paper.
- Step outside at night to see the full effect when your room is lit!
This decoration looks fantastic from both inside and outside, giving you major Christmas curb appeal.
8. Scented Pinecone Potpourri
Let’s not forget about the sense of smell! This easy DIY will make your space smell like Christmas without the need for space-hogging candles.
What you’ll need:
- Pinecones
- Cinnamon essential oil
- Small decorative bowl
- Plastic bag
- Optional: other Christmas-scented oils like pine or orange
DIY Instructions:
- Clean your pinecones and let them dry completely.
- Place pinecones in a large plastic bag.
- Add 15-20 drops of cinnamon essential oil (or a mix of your chosen scents).
- Seal the bag and shake well to distribute the oil.
- Let the pinecones sit in the sealed bag for 24-48 hours to absorb the scent.
- Arrange the scented pinecones in a small decorative bowl.
Place this aromatic creation on a coffee table or countertop for an instant festive atmosphere that engages multiple senses.
9. Miniature Christmas Village
Who says you can’t have a whole Christmas village in a small space? This tabletop version is utterly charming and takes up minimal room.
What you’ll need:
- Small wooden birdhouses (3-5)
- Acrylic paint in festive colors
- Miniature bottle brush trees
- Fake snow
- Small figurines
- A wooden tray or cake stand
- Paint brushes
- Hot glue gun
DIY Instructions:
- Paint each birdhouse to resemble a different building (e.g., cottage, church, shop).
- Once dry, add details like windows, doors, and roof tiles with a fine brush.
- Arrange the painted houses on your tray or cake stand.
- Use hot glue to secure them in place if needed.
- Add mini trees and figurines around the houses.
- Sprinkle fake snow over the entire scene for a wintry effect.
- Optional: Add tiny LED lights inside the houses for a cozy glow.
This adorable setup can live on a side table, kitchen counter, or even as a centerpiece on your dining table.

10. Christmas Card Display Wreath
Turn your holiday cards into a festive decoration with this clever wreath idea.
What you’ll need:
- A wire hanger
- Clothespins (20-30)
- Ribbon
- Pliers
- Christmas cards
- Optional: spray paint for clothespins
DIY Instructions:
- Untwist the wire hanger and shape it into a circle using pliers.
- Optional: Spray paint the clothespins in festive colors.
- Once dry, clip clothespins all around the wire circle, facing outward.
- Cut a long piece of ribbon and wrap it around the wire, covering any exposed parts.
- Create a loop with the ribbon at the top for hanging.
- As Christmas cards arrive, clip them to the clothespins.
Hang this on your door or wall for a decoration that grows more festive as the season progresses!
Wrapping It All Up
So there you have it! With these DIY Christmas decoration ideas, your small space can be transformed into a festive haven that radiates warmth and cheer. Remember, it’s not about how much room you have; it’s about the joy and creativity you bring to the season. I hope you’re inspired to give some of these projects a try and make your home feel merry and bright. I’d love to see what you come up with, so don’t be shy—share your holiday creations with me! Let’s spread the love and magic of Christmas together, one small space at a time. Happy decorating!
Disclaimer: This blog post contains affiliate links. This means that if you click on a link and make a purchase, I may receive a small commission at no additional cost to you. These commissions help support the maintenance and growth of this blog, allowing me to continue sharing valuable content with you. I only recommend products and services that I truly believe in and have personally vetted, ensuring they align with the interests and needs of my readers. Your support through these affiliate links is greatly appreciated!
[/et_pb_text][/et_pb_column][/et_pb_row][/et_pb_section]